The fastest way to build a foundation today is to use blocks. Although this method has some drawbacks, it acts as a more profitable solution in terms of saving time. Any builder will tell you that it is much more convenient to pour a flat foundation surface and work with it in the future, but the concrete must reach the desired condition before you start building the building itself. As for the block foundation, it can be built in a short time, you can start work in the fall or spring, and such a foundation is suitable even for a change house.
Territory marking
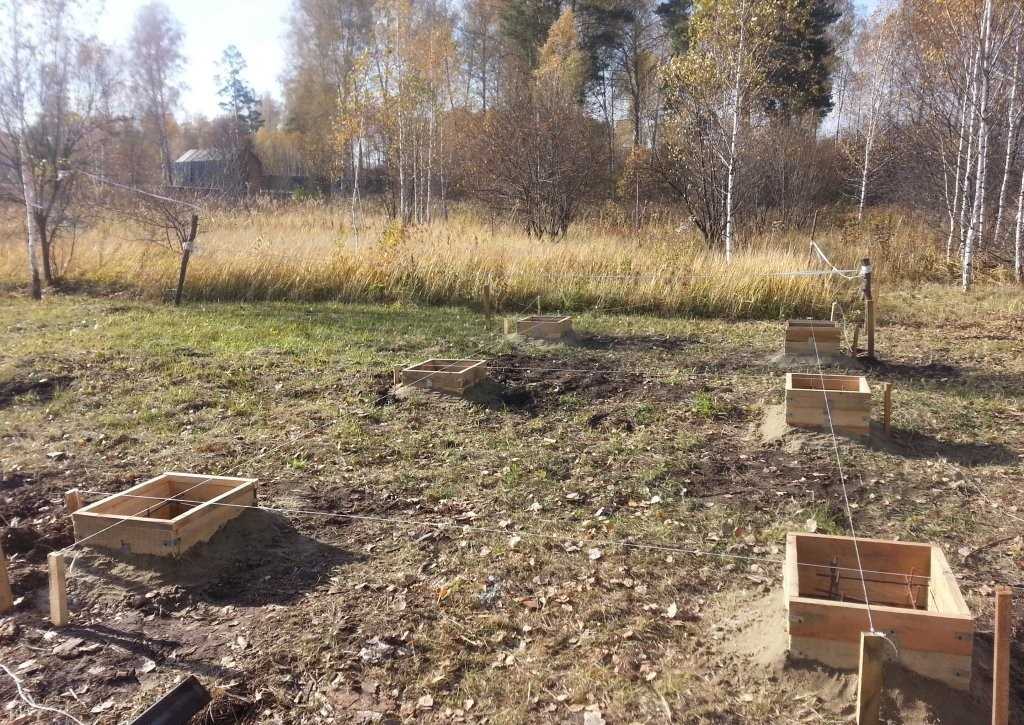
Before you make a foundation for a change house, you must mark the area. To do this, you need to mark the boundaries of the building. It is better to do this with a rope, metal pegs and a building meter. When marking, it is important to consider that the width of the foundation should be greater than the width of the wall.
Excavation

Once the marking work is completed, you can begin to prepare the ground. If you plan to build a columnar foundation from blocks, then along the perimeter of the marking and inside it, it is necessary to prepare holes, the depth of which will be approximately 1.5 m. If we are talking about a strip foundation, then it will be necessary to remove the topsoil and dig a trench, which will turn out several centimeters wider than blocks.
When building a foundation for a change house, you must remember that the depth of the trench will depend on the type of soil. If you have to work in sandstones, where the depth of the aquifer exceeds 2 m, then it will be enough to go deeper by 40 cm, in all other cases this parameter should be increased.
Work technology

The above stages are preparatory in nature, while the next step will be the main construction, which must be taken with responsibility. When building a foundation for a change house from blocks, you must connect the elements together with cement mortar, which is closed before laying.
Do not dilute the solution with water during operation, as this may reduce contact. Blocks should be placed one above the other, using the principle of brickwork. In this case, deviations within 15 mm per 10 m are permissible. All seams and joints are filled with mortar to eliminate gaps.
Features of the construction of a columnar foundation

If you decide to build a foundation for a change house from blocks with your own hands, then the work may be based on the technology of building a columnar base. In this case, the design will look like this: the supporting pedestals are dug deep into the ground and are located along the perimeter of the marking and inside it. You can use this type of foundation for light buildings, this should include not only change houses, but also:
- wooden baths;
- country houses;
- garages.
The construction of such a foundation for a change house is carried out in just one day. Along the perimeter of the building, it is necessary to install cabinets in the prepared pits, the height of which will be approximately 40 cm. Their number depends on the weight and size of the change house. However, before starting the installation of the pillars, it is necessary to prepare the pits. Their bottom is compacted with a special tool or a long stick. Next, crushed stone is poured, this layer should have a thickness in the range of 10 to 12 cm. The next layer will be sand, the thickness of such preparation can be equal to the limit of 5 to 7 cm.
Work methodology

The surface is leveled, only after you can proceed with the installation of the first row. The elements are fastened together with cement mortar. When erecting a block foundation for a change house, you must remember that the supports must be leveled. If even the slightest inaccuracy is allowed, then this can lead to distortions, which will be quite problematic to correct. Therefore, when erecting a columnar foundation, it is necessary to monitor the level by first stretching the ropes between the supports.
The construction of the strip foundation

The strip foundation of the blocks will be more durable. It is a tape that will be located under the supporting elements. Blocks made of expanded clay concrete are better than others for work, as they are lighter than concrete ones. In addition, installing such products is quite easy. Their weight is only 30 kg.
The construction of the strip foundation is carried out according to the scheme described above, however, a filter pad made of crushed stone and sand is placed in a trench. For the bottom row, pillow blocks should be used, and it is necessary to start laying them from the corners and those places where the walls will intersect. After installing the corner blocks, it is necessary to check the correctness of their location using the building level, only after that you can proceed to laying, focusing on the rope stretched between the first blocks.
After completing the installation of the bottom row, a waterproofing layer should be laid, which will prevent the penetration of moisture into the material. If you are thinking about the question of how to make a foundation for a change house with your own hands, then it is important to remember that with the help of metal pins it is necessary to mark the places for lighthouse wall elements of the second row. The bottom row is covered with cement mortar, only after that you can proceed to the installation of blocks from the next row.
The basis for a change house from tires

As an alternative solution, a tire foundation can be used. At the first stage, the construction site is cleared of stones and debris, after which a foundation pit is dug out on it, while taking into account the trench indentation of 20 cm on each side. It is better to go deeper by 30 cm, however, the final value will depend on the source material for pouring.
If you are thinking about the question of how to make a foundation for a change house from tires, then it is important to follow the technology. At the next stage, it involves leveling and compacting the bottom of the trench. Next, you need to prepare the tires, laying one at a time at the bottom of the pit. They should be located end-to-end, parallel to the ground plane. The space inside the tires is filled with broken bricks, sand, earth and rubble. The space between the tires is filled according to the same principle. The embankment layer must be positioned so that the tires are completely covered.
Equipping the foundation for a change house from tires, you must prepare the basis for pouring. First of all, sheets of roofing material are laid, which will act as waterproofing. Then you can proceed to For this, a board and a beam are used. The formwork must be laid out in such a way as to obtain a monolithic concrete slab acting as the top of the foundation.
The design is additionally reinforced, for this metal, channel or mesh is used. Filling is carried out with an ordinary solution, to which a plasticizer should be added. This will prevent the formation of cracks and chips. The poured solution is covered with a rag, which should be soaked in ammonia, this will save time for drying. Such a foundation for a change house is left for a week to gain strength and reliability. Then the formwork can be disassembled. It is important when pouring to observe the horizontal surface of the future plate. To check this parameter, you should use the building level.
Conclusion
The foundation acts as the foundation of any structure. To build it from new building materials is not a cheap pleasure, so home craftsmen eventually began to look for budget solutions. The foundation for a change house can be built from tires. This approach is cost effective and easy to implement. A feature of this design is that the installation process does not imply that the master has special skills and experience.
This technology is suitable not only for change houses, but also for baths, gazebos, garages, sheds, and chicken coops. At the same time, two problems can be solved at once: to build a solid and inexpensive foundation, as well as to dispose of used tires.
Having bought a plot, land, you think about the fact that you need to live somewhere while building a house. Such a temporary home in a summer cottage or garden plot is a change house. A small insulated structure, usually 3x6 or so in size. There are a lot of offers on the market: both wood and metal. But their quality is more than doubtful, the cheapest materials are used in construction. This is easy to verify by calculating the costs that you will incur if you decide to make a change house with your own hands. With the same dimensions, it’s cheaper for you, most likely, it won’t work, and if there is savings, then it’s small. You will consider normal materials, not the cheapest ones. But in terms of quality and durability, home-made change houses are many times superior to purchased ones.
Change house on the site is the first (or second after) structure that appears on the site
What and how are they built
Almost all change houses are built using frame technology. As building materials for the frame, a wooden bar at least 100 * 150 mm or a profiled metal pipe 60 * 60 * 2 mm is used.
For sheathing, the choice of materials is much wider. Use:
- edged board;
- sheet material -,;
- profiled sheet;
- siding.
In any case, the lining is done on both sides - outside and inside. The outer one can also be metal, but inside they often make either lining or stuff plywood or OSB.

Thermal insulation is laid between the two skins. Although the building is temporary, spring and autumn, and sometimes summer nights, can be very cold. Therefore, without insulation - in any way. Any heater is possible. Better - mineral wool, cheaper - polystyrene. Extruded polystyrene foam has the best characteristics, but also the highest price. Just when choosing a heater, keep in mind that the foam almost does not muffle the sounds, so that the especially nervous will not be able to sleep. Therefore, the best choice is mineral wool. What layer? If wisely, then in Central Russia, preferably 100 mm, but at least 50 mm.
Please note that the floor also needs to be insulated. Especially the floor. The bottom is very tight. Therefore, it should be double: first, a rough one, on top, across the board, they put logs, a heater between them, and then a finishing floor.
Layout and drawings
Despite the fact that the building is considered temporary, it often turns into a bathhouse or a guest house. Therefore, even in a change house there is such a thing as planning. Even temporary housing should be relatively comfortable.
Change house trailer
There are two main types of change houses: trailer and vest. In a trailer-type building, the entrance is on the side, there is no separation inside, in extreme cases they put a partition - 1.5-2 meters from the entrance. This room is used as a vestibule-dressing room and a warehouse for storing tools. This is the simplest possible option.

The drawings will contain graphic and numerical designations, their decoding is in the photo below.

vest
The most popular layout is the vest. This is when the entrance is in the middle. moreover, the middle is fenced off and used as a vestibule, pantry, etc. The purpose of the other two rooms may be different. Someone uses both as bedrooms, someone uses one as a kitchen.


Change house with toilet and shower
Not everyone agrees to lead a Spartan lifestyle even at a construction site or dacha, even temporarily. At least basic amenities are required. Although it's probably better to build them separately.

San block is on the edge - a wiser decision, especially if you make a separate entrance

with toilet
Having chosen a drawing, do not forget, when developing a frame for a change house, that racks must be placed at the junction of the walls. If doors are attached to the racks, they must be reinforced - double.
Foundation for a house
Since the structure is temporary and light, the foundations are usually posts or blocks. Mostly blocks. Preferably - concrete, standard. No - you can use any construction, but high density and not hollow.

They are placed on a prepared base. If the soils are normal, you can simply remove the sod and level the sites. For greater reliability, they dig a small pit under each block with a depth of about 20-25 cm. Crushed stone of the middle fraction is poured into it and rammed well. Blocks are placed on such a substrate.
Note! The top edge must be level (be in the same horizontal plane). It is also necessary to check the geometry of the foundation: the angles are strictly at 90 °, the diagonals are equal.
With a change house width of not more than 2.5 m and using a wooden beam for the frame, blocks are placed in each corner, as well as under those places where the partitions depart. If the building will be without partitions, the spacing step - every 1.5-2 m - depends on the cross-section of the beam and the planned sheathing, as well as the weight of the roofing material. With a width of 3 m or more, an intermediate beam is required, and a base for it. In this case, three rows of blocks are obtained.

To prevent dampness from entering the premises, waterproofing is laid on the blocks. You can - two layers of roofing material, you can - another waterproofing material, even a film. Another option is to coat with bituminous mastic. On this, the foundation can be considered ready.
Step-by-step instructions: photo reports with explanations
It is difficult to understand some things from the description. No matter how much you read, but until you do it, or at least look at how others do it, you won’t understand. That's why photos of the construction of change houses are useful: you can see how the nodes were made and find a solution for yourself. This is a kind of guide for those who decide to build on their own.
Construction of a wooden cabin
A change house was built from wood in the country. Dimensions 3 * 6 m, insulated - for temporary residence during the construction of the house. Used the following materials:

Since the prices of materials are very dependent on the region, it makes no sense to talk about the cost of construction. But according to this list, you yourself can determine with fairly high accuracy how much a change house built by yourself will result.
Please note that this list does not include roofing material (ondulin was planned) and there is no glass. Also, lining for interior decoration was not purchased.
Before the start of construction, all wood, with the exception of the lining, was treated with Senezh Ultra antibacterial impregnation. Coated in two layers. So the quality of processing should be normal.

The site for the building has been marked out. We decided to put the blocks on the sand bed. They dug holes with a depth of 25-30 centimeters, poured sand, tamped. Set up blocks. First, they put out the two extreme ones, put a flat board on them, and a level on it. So put the extreme blocks. Then intermediate boards were adjusted to the height of the board. So on all sides.


The next step was laying the floor joists. They were put in 50 cm, we will put racks through one. Made from a board 50 * 100 mm, placed on a narrow part.

We decided to immediately assemble racks with rafters on the ground, strengthen the joints with corners, and then install them in finished form. Collected from the same board 50 * 100 mm.

We knock down the front rack - it is longer, the back and the rafters


They nailed the racks with long nails. Then, for reliability, all attachment points were reinforced with corners and plates. They were already planted on self-tapping screws.
Bars 50 * 50 mm were nailed on the sides of the log. It turned out "nests" for laying foam. It was placed on mounting foam: both hermetically and reliably. A floor board was nailed on top.


Now the sheathing has gone directly. A lining of packs of 3 meters went to the short side, six meters were nailed to the long ones.

Having made the sheathing to half, they laid the crate under the roofing. They nailed a board 25 * 150 mm in increments of 30 cm, along the edges a pitch of 20 cm (so that the overhang could withstand). Then we continued with the trim.
In the places where the windows will stand, they put mortgages - a board that lies across the rack. The window frame will rest on it. They fastened with nails, through and through, but additionally the connections were reinforced with corners.

When the back and blind side walls were sewn up almost to the top, roofing material was rolled onto the roof. He will lie until we buy ondulin.


The outer casing is almost ready. Doors were bought without finishing - only a frame upholstered with fiberboard

While we were finishing nailing the lining on the outside, work was also in full swing inside - they put foam. The width of the sheet is 100 cm, the distance between the posts turned out to be 95 cm. Thin strips have to be cut off.

So that it does not “fall”, we grab it from above with thin corners, which we attach, of course, only to the bar of the rack.


We started lining the inside, but the lining ended. While switched to painting the outside. It turned out well, it seems.

We bought the lining, finished the interior decoration.

Started building the partition. It was assembled from the same boards - 50 * 150 mm. The joints, traditionally, were reinforced with corners. Sheathed - clapboard.


Roof insulation has begun. They used the same foam and the same technology - they propped it up with corners.

Joints with wall insulation were foamed with mounting foam.

After we started lining the clapboard.


Ceiling trim finished
Started laying roofing. We bought ondulin and laid it with an overlap on one wave. They were attached to each wave with special hardware purchased along with ondulin.

Mounting ondulin on the roof of a garden shed
Then we began to bring to mind the interior. The partition was also insulated with foam, sheathed on the second side with clapboard.


This is how it looks like in the final version
Lining inside is covered with water-based varnish. It gives only a slight tint to a slightly darker color. Films on wood seem to be non-existent. If you look directly, it generally seems that the tree is not covered with anything. Only if you look from the side at a certain angle, you can see the shine.

On the floor, the varnish is already with a film: so that the wood does not wear out. Coated in two layers.
After we started finishing the overhangs. They were all sewn up with the same clapboard. In general, work with lining took the most time.


And this is a side view
Metal frame for shed
Metal was chosen as the basis as more reliable and durable. The idea that the change house may have to be moved also played its role. If the frame is made of metal, nothing threatens her.

The dimensions were determined based on the length of the corner whips: 11.7 m. The following dimensions emerged: 2.8 * 5.8 m, height - 2.5 m. The frame was welded from a corner with a shelf of 75 mm, 6 mm thick.
The foundation is made on self-cast columns: construction began in autumn, and there is still nothing more to be done. So it was decided to pour reinforced posts: six pieces. First, the site was marked out, after which the places for the foundation columns were determined.

Holes 50*50 cm were dug, the total depth was about 30 cm. Crushed stone was poured into the bottom with a layer of about 10-15 cm and compacted tightly. From above, the same amount of sand, also with a rammer. As a result, the backfill came out on the same level with the ground.
Roofing material is laid at the bottom so that moisture does not leave the concrete, and it “matured” normally, and did not dry out. Next, the formwork was assembled and the reinforcement was laid in it.

The site is dry, the water drains normally, so there shouldn't be any problems. , so that the reinforcement is either welded or twisted - it is not clear.
Everything is filled with concrete, covered with a film: the end of October, and in order for the concrete to be of a normal fortress, it needs to be wrapped.

The frame frame was cooked for a long time - all winter: frosts, workload, did not allow to act with the desired frequency. The base was cooked from a corner of 75 mm, 6 mm thick, 40 * 2 mm were used for reinforcement.

The beginning of the frame of the change house from the metal corner - the lower harness
The side parts were cooked as a whole, then with the help of 4 people they were placed in a vertical position and so fixed. On the racks to which the window frames and doors will be attached, profiled pipes 40 * 40 * 2 mm went.

The most inconvenient moment is to measure the diagonals alone. You have to constantly control them, and doing it alone is inconvenient. But everything must be set, otherwise it will be skewed.
To give greater rigidity, I welded strips of metal in the corners. I received them by opening a corner (40 mm). It was possible to buy a strip, but I used corner trimmings.

Stripes for rigidity in the corners of the frame

View from inside the corner
It was difficult when they put the frames: in the cold, only in thick gloves, and it is difficult to hold them tightly. Therefore, they propped up with boards, with everything they could. But the corner was kept strictly.

In order to have a rigid fastening to the frame, metal plates are welded at an angle.

Gradually assembled the entire frame.


We weld the plates in the corners: top and bottom

We weld a few beams at the top. Now the frame for the change house is "iron"

Now the skin remains. It can be anything: at least the same lining, block house, at least an economy option - plywood and OSB. To attach the bleaching to the corner, it is more convenient to screw the timber, and to it already attach the crate and everything else. The situation is the same for the rafter system: around the perimeter, a bar is screwed onto self-tapping screws with preliminary drilling, and rafters are attached to it.
Related videos
The change house is a temporary structure, but this does not mean at all that its installation can be done carelessly. Firstly, for some time the change house should still serve faithfully. Secondly, a country change house in general can be a completely permanent structure. Thirdly, the change house can be used repeatedly, which requires ensuring its safety.
Site preparation
The change house has to be established on an equal platform. If you plan to use a block or pile foundation, then it is not necessary to level it too much - it is enough to eliminate obvious height differences.
When installing a change house, serious preparatory work is rarely practiced - they are limited to removing debris, mowing the grass and leveling the site. However, in the case of a country change house (that is, a permanent object), a more serious reason can be made:
- dig a small pit (300 mm);
- cover with sand or gravel;
- tamp thoroughly.
Why install a change house on something?
With direct contact between the change house and the ground, accelerated wear of its bottom and supporting pillars will occur. This is especially true for wooden change houses, which are the most popular among summer residents and individual builders.
Constant moistening of the lower parts of the change house due to contact with the ground will lead to the development of mold and putrefactive processes. In addition, thermal insulation properties will deteriorate, which will require additional heating.
About what happens to the change house, standing right on the ground, after a serious rain, we generally keep silent.
block foundation
The most optimal is the installation of wooden change houses on concrete blocks. Blocks can be used in different sizes, but usually they are relatively small pieces of 400x200x200mm.
Blocks must be installed under the load-bearing skis of the change house at the rate of 1 support for every 2 meters. Based on this requirement, designate the placement of the blocks, and proceed as follows:
- Prepare the base (if you did not do the general) - pits according to the size of the block, about 100 mm deep.
- Fill the holes with sand. Please note that if the unevenness of the site remains, they can be compensated for by the level of sand.
- Concrete slabs, at least 50 mm thick, should be laid on the sand, which will prevent the blocks from sinking into the ground.
- The blocks are installed on the plates perpendicular to the direction of the bearing skis.
- How many blocks to put? The question is quite interesting: the higher the change house above ground level, the better it is protected from decay and other negative factors. But climbing a high change house is not always comfortable. Therefore, 1 or 2 blocks are most often used.
- A roofing material is laid on the blocks, on which it is already possible to install load-bearing skis. The roofing material will provide reliable waterproofing of the wooden structure of the skis and the change house itself.
Installation on screw piles
Technologically, this installation method is more complicated than a block foundation and requires the participation of professionals. On the other hand, with this approach, you can not particularly prepare the site, and the overall reliability of such a foundation is higher.
The advantage of screw piles is their relatively easy installation - they are literally screwed into the ground. The step may be different, depending on the size of the change house. Usually, it is about 1 meter along the perimeter of the building.
The frame of the change house is assembled directly on the piles, which are subsequently sheathed with the selected material. Thus, the use of screw piles is more suitable for wooden cabins designed for long-term operation.
The content of the articlePerhaps many have seen that on construction sites there are small wagons, unsightly buildings with a chimney, sometimes on wheels, sometimes standing on the ground. These are the so-called change houses in which workers change clothes, have lunch, store equipment, and wait out the bad weather.
Such structures, if they are on wheels, are easy to move from one construction site to another. But, despite the fact that they are intended for the temporary stay of workers in them, change houses are successfully used as temporary dwellings in summer cottages, while the main building is being built, as a bathhouse, a barn. The scope of such buildings is very extensive.
However, in order to make living in such buildings as comfortable as possible, the change house must be made a foundation for the change house and insulated.
Foundation selection
Depending on what kind of change house is planned, the type of foundation is selected.
According to their type, the foundations are divided into:
- Tape.
- Pile.
- Columnar.
- Slab.
But for such a structure as a change house, a shallow columnar one is enough. Why him? Yes, for the simple reason that the change house is not such a powerful structure, which requires the construction of a monolithic reinforced concrete tape. And since it is considered a temporary structure, it can be dismantled at any time. And then dismantling the columnar foundation will not cause much trouble, unlike a monolithic reinforced concrete one, which is not so easy to demolish.
In addition, a columnar foundation will cost a meager amount compared to a monolithic strip or slab foundation, and will require less labor.
Sometimes for a change house the foundation is not arranged at all. Directly on the rammed area, a frame of timber is erected and sheathed with boards or slabs, covered with roofing material and everything is temporary  haven is ready. The only thing that is done in this case is adding sand, gravel or slag and installing the bottom trim of the frame on bricks or concrete blocks so that rainwater does not flow into the structure. And in this case, the same bricks or blocks also perform the function of the foundation.
Well, if a foundation is being built for a change house, then they don’t make it high. Enough 30-40 cm above ground level. This will make it possible in winter to insulate the lower part of the change house by throwing more snow. And then the change house can be used even in the cold, if you still install a heater or build a makeshift stove.
Preparatory work for the construction of the foundation
Before you start building a foundation, you need to select a site for a change house and prepare it. If there are shrubs or trees, they need to be uprooted, the site should be cleared of vegetation residues and possible debris.
After that, marking is done. At the corners of the site, pegs are hammered according to the size of the future foundation, and a cord is pulled, which will mark the center lines. At the intersection of the lines and on the sides, after 2-3 meters, the places for erecting columns are marked. But before that, it is necessary to remove the top layer of fertile soil.
If a strip foundation is being decided, then the soil is removed around the entire perimeter of the future building.
Pillar foundation for a shed
Further, at the marked places, sand and gravel bedding 10-15 cm high is made, which is carefully rammed with moisture. After that, the foundation is built under  trailer made of red burnt bricks or concrete blocks. Masonry is carried out with dressing of seams on cement mortar.
You can make a columnar foundation monolithic. But for this it is necessary to first install the formwork and place the reinforcing cage inside it. For formwork, wooden boards or shields are used. Both of them must be tight and without gaps so that the cement milk does not flow out through the cracks, as this weakens the strength of the structure being erected.
The reinforcement is selected with a periodic profile with a diameter of 0.5-0.8 cm. The frame is connected with annealed wire or spot welded with a step between the bars of 10-15 cm. The distance between the reinforcement cage and the formwork wall must be at least 5 cm. when pouring the concrete mix, a protective concrete layer equal to 5 cm should be formed, which protects the reinforcement from corrosion.
So that the reinforcing cage does not move from its place during concreting, pieces of concrete, brick or foam plastic 4-5 cm in size are tied to it in several places.
Regardless of whether the foundation for the change house is made of blocks or of red brick, or of monolithic reinforced concrete, it is necessary to make waterproofing, for which the top of the foundation is covered with pieces of roofing material, and a strapping of timber with a section of 100x100 or 150x150mm is already installed on top.
Between themselves, the timber is fastened with metal corners or corner joints are arranged in half a tree, in a paw and others used in wooden construction. But as practice shows, most often people use metal corners. This is much faster and keeps the structure no worse than the above cuts.
The beam, by the way, also needs to be treated with antiseptic solutions to prevent decay.
The erection of the tape base
Do-it-yourself strip foundation for a change house is arranged similarly to a columnar one, with the only difference being that instead of holes for the columns, a shallow trench is dug, at the bottom of which sand and gravel bedding is also arranged.
It is determined based on the quality of the soil and the features of the relief on the site. The most common types of foundations for change houses and light buildings:
- Svaynovilovaya;
- Piled by TISE technology;
- Columnar;
- Shallow strip foundation.
Before considering the correct solutions from an engineering point of view, let me tell you, how the "foundation" is done in practice in most cases(at least among summer residents in the Moscow and Vladimir regions).
6 foundation blocks are bought (the price range is from 50 to 100 rubles per block). The blocks are laid out under the change house and are adjustable in height according to the level (they are dug in where necessary). That's the whole foundation, and then let's move on to how it should be done correctly.
Pile screw foundation for a change house in the country is often made if the relief of the suburban area is even and at the same time the soil has sufficient density. Ideally, when in the thickness of the soil, after 2.5 meters, a layer of clay or concentrated loam begins. The manufacturing process of this foundation consists in screwing metal piles into solid ground at a distance of 1.5-1.7 meters from each other. Subsequently, the drilled metal piles are tied together with a strapping using a wide channel or I-beam.
Foundation made according to TISE, often erected in areas with a pronounced slope or existing depressions. For this type of foundation, liquid concrete of the M400 grade, reinforcing cages and the participation of special equipment are required. Initially, round wells are drilled with a diameter of 20-30 cm with a distance of 150 cm from each other. Then a special drill is lowered into the wells, which is equipped with a plow controlled from the soil surface. With this plow, soil is cut out at the bottom of the drilled well, and it turns out that an expansion is formed at the bottom of the well. Subsequently, a reinforcing cage is installed in the well and concrete grade M400 or M450 is laid.
Column Foundation for a change house is made on stable ground and if the suburban area does not have a slope. Bearing pillars can be made of concrete or ceramic bricks. Initially, square 40 × 40 cm holes are pulled out. Further, the bottom of the pits is reinforced, and reinforced concrete pillows are poured with the release of reinforcement. After about 7-10 days, a frame is knitted to the released reinforcement and a formwork box is installed on top of it. After that, a monolithic reinforced concrete pole is poured and all similar poles are tied.
Shallow strip foundation for a country change house it is made rather seldom. For example, this type of foundation is made if it is planned to use a change house for more than 10 years. The design of the foundation is simple, a trench 30 cm wide and more than 70 cm deep is dug along the perimeter of the future structure. Further, reinforcing cages are laid horizontally at the bottom of the trench. Next, the trench is poured with liquid concrete grades from m350 to m450.
Editor's Choice: Foundation Blocks.
As noted above, in practice summer residents avoid complex foundation structures. This is typical for change houses, where there is always a desire for budget and economy.